How to Clean a Hydration Bladder
You may have already experienced bad odors in a hiking bottle or a hydration bladder. After a few outings, this gourd becomes nauseating, and water systematically takes on an unpleasant taste. Even with regular rinsing, the persistent issue has reached a point where you’re contemplating getting rid of your hydration bladder. However, before consigning it to the trash, pause for a moment! Take a look at these techniques for how to clean a hydration bladder, and you might just be able to salvage your favorite container.
Bad Odors and Strong Taste: Why?
Like any freshly purchased product, a hiking water bottle or a new hydration bladder is likely to smell musty. Conversely, a container that has been used multiple times can also be the source of an unpleasant odor and taste due to the many bacteria that accumulate inside.
There is unfortunately not much to do against this since these are installed during multiple manipulations (opening and closing the gourd or opening and closing the valve of the pipette of the water bag) or simply in contact with our mouths! And if you are used to filling your water bottle with coffee or energy drinks, the deposits will give them enough to develop. So is all lost? Absolutely not, and I’ll a few techniques to give you to get rid of odors.
Cleaning a Hydration Bladder in 3 Steps!
Let’s see how to clean a hydration bladder or a hiking bottle step by step:
Basic Yet Effective: Hot Water and Dishwashing Liquid
The timeless method of cleaning a hydration bladder or hiking bottle involves a straightforward mixture of hot water and a few drops of washing-up liquid. This classic approach, though simple, proves highly effective in eliminating persistent odors. Just fill your container with hot water, add a dash of dishwashing liquid, shake vigorously, and use a bottle brush to scrub away potential microorganisms. Rinse thoroughly and allow it to air dry to prevent the development of mold.
Tougher Odors? Try Vinegar and Lemon Solution
For lingering smells and tastes, take the next step by creating a solution of one-third vinegar to two-thirds water, with a few drops of lemon added for freshness. Let this mixture sit overnight to thoroughly cleanse the interior of the bladder. Rinse it thoroughly with clean water the next day to ensure the removal of impurities. If white vinegar isn’t on hand, a mixture of two to three tablespoons of food-grade baking soda and warm water can serve as an effective alternative, providing you with peace of mind.
Attention Hydration Bladder Holders: Combatting Mold in Every Nook
If unpleasant odors persist, especially for hydration bladder users, it’s crucial to address the root cause—mold that can accumulate not only in the bladder but also in the tube. Dismantle each element, and use a cleaning kit with a suitable brush or cleaning tablets to tackle the issue directly. This extra step ensures a thorough cleaning, keeping your hiking equipment free from lingering odors and maintaining the quality of your hydration system.
Maintaining Your Hiking Bottle or Hydration Bladder Over Time: The Secret!
Certainly, it is much more tempting to leave your water bottle or hydration bladder in your hiking backpack after long hours of walking. But would you leave your sweat-stained, mud-stained hiking clothes in the corner without putting them in the washing machine after your ride? Well, the same goes for your water bottle or your pocket.
Rinsing and drying your bottle after each use is imperative to avoid altering its contents afterward. And if you regularly carry out a little cleaning, you will often avoid situations that require bringing out the heavy artillery for in-depth disinfection!
I hope this guide helped you to clean a hydration bladder or hiking bottle easily.
FAQs
How to clean a hydration bladder or hiking bottle?
I recommend you buy a cleaning kit dedicated to this system. Brushes are the best way to clean any area of the hydration bladder. For cleaning, we recommend using soap and water and drying the bag well after each use, especially if used with other liquids than water.
You can also follow this video:
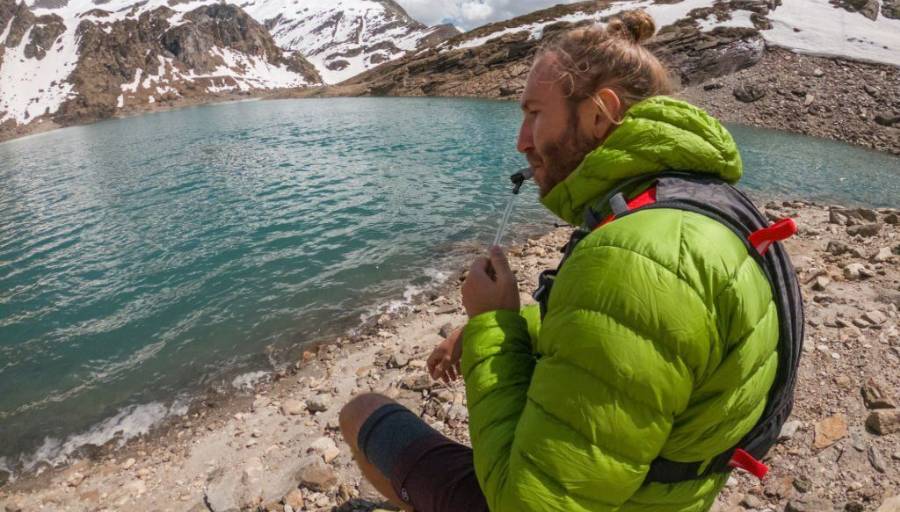
How to get rid of bad taste and odors in a hydration bladder?
Bad tasting water is usually caused by poor quality plastic, as well as sanitation. When choosing a hydration bladder, keep in mind that it is BPA, BPS, and GMP free. If the brand you own doesn’t meet these specifications, you can try to combat the plastic effect by filling the hydration bladder 3/4 full with hot water and inserting a spoonful of baking soda into it, then leaving the solution to sit for about 45 minutes. Don’t forget to rinse the lid well!
Is there a way to fight mold?
The hydration bladder should be kept clean and dry. Some athletes store their empty tanks in the freezer. If you leave deposits in the pocket for a long time or use it with liquids other than water without cleaning it properly after each use, mold can develop. Hot water and two tablespoons of baking soda or bleach can be used to remove them. Hold the reservoir in place and pinch the Big Bite™ Valve, allowing the solution to flow into the hose; then allow the detergent to sit for 30 minutes. When you have finished, wash the tank with warm water and neutral soap, then rinse thoroughly. Air dry to avoid moisture stagnation.
How often should I clean my hydration bladder?
It’s recommended to clean your hydration bladder after every use. Regular cleaning helps prevent the buildup of bacteria, mold, and unpleasant odors.
Can I use bleach to clean my hydration bladder?
It’s not recommended as bleach can leave harmful residues and alter the taste of water. Stick to mild solutions like vinegar or baking soda for safe and effective cleaning.
Can I put my hydration bladder in the dishwasher?
Check the manufacturer’s guidelines. While some bladders are dishwasher-safe, it’s often recommended to hand wash them to prolong their lifespan and maintain performance.
See Also…