13 Tips: How to Setup Guy Lines and Stake Down a Tent
As darkness descends, and the storm intensifies, rain lashes against your tent. Your tent neighbors sit next to you and try to warm up again. An hour ago, the fierce winds took a toll on their tent, snapping its poles and causing it to collapse. At this moment, you find solace in the fact that your own tent is securely anchored, sparing you the need to venture out into the tempest to hammer in pegs and tighten lines.

Ensuring the stability of your tent, your tent must be properly anchored so that it is stable in strong winds. Taut tent lines prevent broken poles. And with a little trick, the zippers can be easily closed even in the strongest winds. We give step-by-step tips on how to setup guy lines and stake down a tent for relaxed camping in wind and storm.
Even when the weather is nice, you should carefully anchor the tent. Why? Well, we answer this question in the following section and then give 13 tips for the correct guying of your tent.
Benefits of Good Bracing
Each tent has loops around its base and along the seams on the tent poles. Guy lines or pegs can be attached here. Why is that so important? Tunnel tents collapse immediately without tent cords. Dome tents can stand up on their tent poles unaided, but there are many important reasons to tie them down:
- Stability: Strong winds (and snow in winter) can bend or even break the tent poles. Guy lines relieve the tent poles and therefore increase the structural stability of your tent.
- Dryness: Double-walled tents consist of an inner tent and a waterproof outer tent. Without guying, water can still get into the tent: when it’s cold and raining, water condenses on the inside of the outer tent and runs down the tent wall. Water then penetrates in places where the non-waterproof inner tent touches the outer tent.
- Room: Good anchoring prevents sagging areas in the tent wall. This provides more space in the tent.
- Ventilation: Tent cords separate the windproof outer tent from the air-permeable inner tent. This allows the air in the tent to circulate better. This improves the air quality in the tent. It is cooler in summer and drier in winter.
Recommended Equipment
A newly purchased tent often comes with lines that are too short and unstable pegs. In order to anchor your tent well and safely, we recommend the following equipment:
- Sturdy pegs: In sandy and loose soils, these pegs with a wide profile provide a secure hold. Unbreakable steel tent nails are a good choice for hard and stony ground.
- Long cords: Tent cords must be of a certain length to give the tent lateral stability. With these 4 meters long pre-cut tent cords you can anchor your tent windproof.
- Good line tensioners: Metal tent rope tensioners are strong, but often have sharp burrs that can damage tent cords. Then, the only thing that helps is to use a file. However, we have had good experiences with these three–hole clamps.
- Tent linen flag: There was a loud rumble last night because someone tripped over your tent cord. Eye-catching tent line flags improve the visibility of the cords day & night!
How Do I Pitch My Tent?
Achieving optimal stability requires correct tent pitching. Here’s 5 steps on how to do it effectively:
- Anchor the Tent Poles to the Ground: At the base of the poles where they meet the ground, you’ll find loops or grommets on the tent. Use pegs to securely fasten them to the ground. This ensures the tent stays firmly anchored to prevent it from being carried away by the wind.
- Connect the Outer Tent to the Poles: Some tents have Velcro on the inside of the flysheet to connect the flysheet to the poles. If your tent has such latches, close them now. The connection between flysheet and poles is important! This is the only way for the guy ropes attached to the outer tent to reinforce the poles.
- Anchor the Flysheet to the Ground: Loops are distributed around the lower edge of the outer tent. Anchor the loops to the ground with pegs. Pull the outer tent away from the inner tent and tension it. If the loops are too short, you can easily lengthen them with tarpaulin elastics.
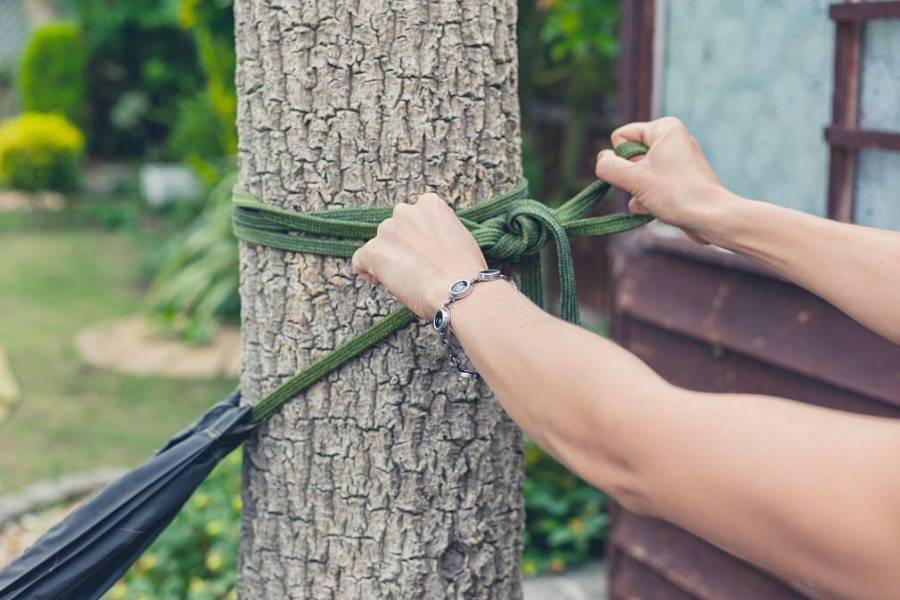
- Tie the Lines to the Tent: In the middle of the outer shell, there are loops for the guy lines. If there are no lines pre-assembled here, you can attach them with a bowline. The bowline holds well, is easy to tie, and also easy to untie. We like to use light, robust, and reflective tent cords for guying.
- Anchor the Lines to the Ground with Pegs: Now the pegs are set and the lines are attached to the pegs. If the lines don’t have loops, you can tie them down with Carter’s knot or with three-hole tensioners. This makes the length of the lines adjustable, and you have more freedom when positioning the pegs.
Tips for Stormproof a Tent
Maybe you’ve seen it yourself: After a violent storm, many tents at the campsite have collapsed and your fellow campers are busy drying their sleeping bags and repairing poles. Yet, there’s this one tent on the lakeshore, right where the wind is strongest, and it doesn’t even have a crease in the tent wall. To master setting up guy lines and staking down a tent correctly, check out the following tips.
1. Close Open Zippers
We too sometimes forget it when the tent comes out of the packsack after hibernation in spring: You should close all zips before tensioning the tent. Otherwise, the zip fasteners will not close properly after untying.

2. Pack Enough Pegs and Lines
Many tents do not come with enough tent pegs and guy ropes from the manufacturer to anchor all the attachment points. You may have to buy some more. Bring a few more pegs than you need. It happens from time to time that a peg gets bent or lost on a stone. We like to use sturdy steel tent pegs with handles (see the model on Amazon). They are extremely robust and suitable for any surface except for very loose soils such as sand.
3. Make the Tent Long!
The tent is most stable when its base is as large as possible.
- For dome tents: Anchor one corner of the tent to the ground with one of the loops attached to the tent near the ground. Then go to the opposite corner, pull the tent taut, and anchor it with a peg. This is repeated until all corners are anchored.
- For tunnel tents: First, attach the two rear corners. Then, pull the tent out and secure the two front corners to the ground with pegs. The sides of the tunnel tent follow at the end.
4. Tie Off Zippers Crosswise
Anchor the two loops at the bottom of your zips crosswise to the ground. This takes lateral tension off the zippers. Secured in this way, the zips close reliably even when the tent is tightly secured with storm cords or strong winds tugging at the tent. A tension-free zipper also keeps rain out better.
5. Drive in the Tent Pegs At a 45-degree Angle
Good tent pegs, if you set them correctly, can withstand almost any wind.
The following tips will keep your tent on the ground:
Each surface requires different pegs. Wide sand pegs give the tent a good hold on loose surfaces such as sand and clay, while robust steel pegs are the first choice for hard and stony surfaces. Pound the peg into the ground with a hammer or a rock. If you press it into the ground with your foot, the peg is subjected to lateral loads and can bend or stretch the earth channel.
The pegs should be sunk so deep into the ground that only a small piece sticks out to which you can attach the tent cord. It is best to drive the peg into the ground at a 45-degree angle. The tip points to the tent. Why? A peg placed vertically is easily pulled out of the ground. If it is set very flat, it will break out under load.
6. Lengthen the Seams
If the peg is on an imaginary line with the tent seam, the tent wall is tightened without any creases. This improves wind resistance and ventilation.
7. Use All Anchor Points
Attaching pegs and guy lines is optional for self-standing tents. However, it makes sense to do this:
The tent stays in place. It cannot slip or stand up in the wind and fly away. A broken pole often cuts through the tent wall. Storm cords attached to the loops along the poles reinforce the poles and prevent breakage. The anchor points at the base of the tent tighten the tent wall and improve the ventilation of the inner tent.
8. Straight Edges for Smooth Walls
Straight edges at the base of the tent ensure a wrinkle-free tent wall. Besides improved ventilation, this has another advantage: the tent wall flaps less in the wind and you can sleep better at night.
9. Storm lines: the 90-degree Angle is Optimal
Storm cords support the tent poles best when they form a right angle with the poles. To get as close to the right angle as possible, anchor the storm lines well away from the tent or support the storm lines with an object such as a branch or walking stick. This significantly increases the stability of the tent.
10. Tighten Everything Up Tight!
Nylon and polyester tents are very tear-resistant. So you can pull the guy lines really tight!
11. Remove Wrinkles from the Tarpaulin
If the tent has even bigger creases, you can try to remove them by moving a peg or adjusting a tent rope. Wrinkled tent walls flap in the wind and can disturb you or your neighbors with loud noises. Sagging tent walls act like a sail and are therefore a danger to the stability of the tent in strong winds.
But small wrinkles are not bad. The ground on which the tent stands is often so uneven that it is not possible to anchor the tent completely without any creases. If all tent walls are stretched reasonably taut, all is well.
12. Make the Tent Lines Visible
Tent lines are almost invisible tripping hazards at night. If you walk into a tent cord, you can fall or rip a loop out of the tent wall. To make them visible, use clothespins to hang light-colored objects, such as T-shirts, on the lines. We recommend these eye-catching tent line flags, in which the lines can also be neatly stowed away when the tent is dismantled. This prevents knots.
Another, albeit small, improvement is reflective tent cords.
13. Re-Tension If Wet
Nylon tent walls and lines can absorb some moisture and therefore stretch when wet. They may need to be re-tightened in high humidity or rain. Humidity increases when it gets colder in the evenings. It is therefore best to check whether a line has come loose before sleeping in the tent.
Related Questions
How many guy lines do I need for my tent?
The number of guy lines needed for your tent depends on its design and size. Generally, it’s recommended to utilize all available attachment points for optimal stability. Smaller tents may require fewer guy lines, while larger or more complex designs benefit from more attachment points. Ensure a balanced distribution to withstand various weather conditions.
Can I use any type of stake for my tent?
While many tents come with basic stakes, choosing the right type depends on the terrain. Invest in sturdy stakes suitable for the ground you’ll be camping on, such as longer stakes for sandy soil and robust pegs for rocky terrain.
How do I avoid damaging guy wires?
Handle guy lines carefully to prevent tangles and knots. Avoid stepping on them, and use line tensioners if available. Regularly check for wear and tear, and replace any damaged guy lines to maintain optimal performance.
Should guy lines be adjusted differently for calm weather versus storms?
Yes. In calm conditions, guy lines should be snug but not overly tight, allowing the tent fabric to flex slightly and maintain proper ventilation. In stormy or windy weather, lines should be tightened more firmly to reduce movement and prevent the tent walls from flapping.
Always make adjustments evenly around the tent and recheck tension after temperature drops or rainfall, as moisture can cause fabrics and cords to stretch.
Conclusion
Good guying increases the stability of your tent enormously in wind and weather. A taut tent wall also improves ventilation. With our 13 tricks, you can anchor your tent really well. Keep in mind that zips should be closed before pitching and always anchored crosswise.
Another important protection against storms is choosing a good pitch and setting up your tent in the correct direction. To learn more about this, check out our guide Camping in Thunderstorms and Lightning: Smart Tips and Gear!